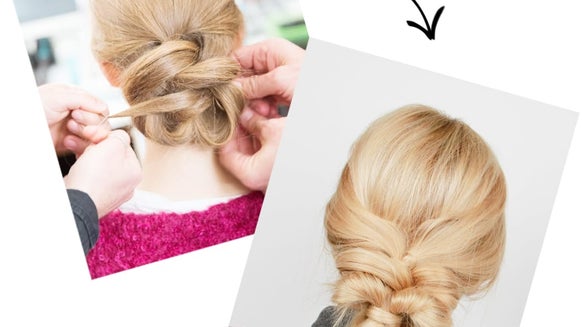
We're suckers for braids and plaits at the best of times, but when we find ourselves in the midst of a festival they've never been more handy. You see, not only do they offer up a variety of pretty ways to pull you hair back out of your face, but they're also the best way to disguise greasy roots when you get to day 3 or 4 and your hair is looking a little worse for wear.
Here are four styles to get you through a festival, from day one right through to the very last song...
Day one: the waterfall braidMake the most of your freshly washed locks while you can. Waterfall braids are whimsical and romantic, while still looking utterly cool. While they look complicated to plait into your own hair, it's actually much easier than it seems and what's more, you could even add a few daisies into the braid for a little extra festival-esque detailing.
1. Staring near your hairline, separate the front section of your hair into three strands as if you're doing a French plait.
2. Now it's time to start braiding. Cross the strand of hair closest to the top of your head over the middle section, then cross the bottom section of hair over so it's now in the middle.
3. Repeat this process, but this time drop the middle strand down so it falls in line with the rest of your hair and to replace it, pick up a new section of hair from behind it.
4. Repeat these steps until the braid reaches the back of your head, then fasten in place with a kirby grip.
Day two: the unicorn braidWe salute whoever came up with this style, as it's ideal for covering roots that are starting to look a tad on the greasy side.1. Section off an inch of hair either side of your parting.
2. Begin to plait it into a French braid, starting from the front of your head and working backwards towards the crown, following down your parting. To do a French plait, you simply divide the hair into three equal sections and as you braid, add a little more hair to each section bit by bit.
3. Secure with a clear elastic band and then loosen the braid slightly to add texture.
Day three: the braided bunThe third day calls for your hair to be pulled back, but to make your average bun a little more interesting we added a plait into the mix too!1. Turning your head upside down, gather the bottom half of your hair and braid it into a French plait from the neck upwards.
2. When you get half way up your head, gather the remainder of your hair up into your hands and secure into a ponytail
3. Twist your ponytail into a loose bun and secure with a kirby grip.
Day four: the halo braidFor the final day, we opted for an all-out halo braid. This style works best when your hair isn't freshly washed as it has more grip, making it the perfect style for festivals! It ensures all your hair is scooped back into the braid, which loops around your head to disguise your roots! It's like it was invented for shower-less occasions like this...1. Split your hair into two even sections. Grab three bits of hair from the bottom of the first section and start plaiting around the hairline, working your way up towards your forehead.
2. Continue over your parting and start feeding in hair from the other half of your head. Continue until you reach the other side of your neck. Continue plaiting until you run out of hair, leaving an inch at the end, and secure with a small clear band.
3. Wrap the braid around your head so it follows a halo shape, then fasten in place with grips, tucking any extra hair into the plait to disguise the join.